Step-by-Step Guide to Replacing a Toilet
How to Replace a Toilet – When it comes to do-it-yourself
 When it comes to do-it-yourself home improvement, few projects strike fear in the hearts of homeowners quite like toilets. It just seems like so many things could go terribly, horribly wrong, doesn’t it? No one likes the thought of making a mistake that involves sewage thus requiring a plumbing rough-in guide.
Fortunately, replacing a toilet is a much less complex task than most homeowners realize. If you have the right materials and a tiny bit of know-how, the chances of a major disaster are slim.
Here’s a step-by-step plumbing rough-in guide to replacing a toilet.
Step 1: Gather Your Supplies
To replace your toilet, you’ll need:
- New toilet bowl and tank—one that’s the right size (more on that in a moment)
- Flush valve, bolts (we recommend brass), wax ring, and toilet seat (if not included)
- Supply line, if you need/want a new one (we recommend flexible ones covered in stainless steel mesh)
- Penetrating oil
- Adjustable wrench
- Putty knife
- Floor cleaner
- Old bath towels or large rags
Choosing the Correct Toilet Size
Toilets come in a couple of standard sizes (and a few custom ones, too). With your old toilet in place, measure from the wall behind the toilet to the center of one of the bolts holding it to the floor. The standard rough-in is about 12” from the wall. If you have a small bathroom, it’s wise to use this plumbing rough-in guide properly specially in measuring from the side of the tank to the wall and from the front of the toilet to the door. Some elongated bowls won’t fit in small bathrooms—or they’ll fit, but you won’t be able to close the door!
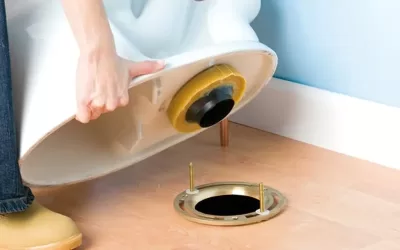
Step 2: Remove the Old Toilet
- Turn off the water to the toilet by closing the supply line valve.
- Flush the toilet and, using one of your old towels or rags, sop up any remaining water in the tank.
- Disconnect the supply line from the bowl, unless you plan to replace it. In that case, disconnect the supply line from the valve instead.
- Remove the tank lid and carefully place it on the floor, away from your work area.
- Unscrew the nuts from the bolts holding the tank to the bowl. Lift the tank up and away from the bowl, and set it aside. If you’re having trouble getting the nuts to release, spray some penetrating oil on them and wait a few minutes before trying again.
- At the base of the bowl, remove the decorative caps from the bolts anchoring the toilet to the floor, then remove the bolts. You may need your penetrating oil again.
- Gently rock the bowl back and forth to release it from the floor gasket. Once it’s free, carry it outside immediately or place it on an old towel or rag. (Those gaskets get pretty gross, and the bottom of the bowl will have residue that can harm floors and other surfaces.)
- Put an old rag in the hole to prevent sewer gas from coming up into the bathroom while you work. Make sure your rag is big enough so it doesn’t fall into the drain.
- Scrape any remaining wax from the floor, using a putty knife.
- Thoroughly clean the floor around the drain hole in preparation for the new toilet.
If Your Floor Flange is Damaged
Once you’ve removed your old toilet bowl, you may discover that the floor flange—the piece to which the bowl mounts—is damaged. If that’s the case, you have the choice of continually using this plumbing rough-in guide or else, we’d be happy to help you replace it.
Step 3: Install the New Toilet
New toilets come with installation directions, and it’s a good idea to review those. In general, though, you can use the following steps to install a new toilet:
- Install your new mounting bolts in line with the wall behind the toilet.
- Spread a towel on the floor, then carefully turn your new bowl on its side.
- Place a new wax ring on the part of the bowl that extends into the floor flange.
- Remove the rag from the drain hole, and carefully place the bowl in position. Admittedly, this can be the most frustrating part of the process. Be patient and remember your new toilet is a bit fragile. Also, if you smash the new wax ring as you’re trying to line things up, you’ll need to use another new one.
- Spin the nuts onto the bolts—loosely—and then sit on the toilet to seat the wax ring. Gently lean side to side and front to back until the toilet is sitting squarely on the floor. If necessary, use rot-free shims to level the toilet. Rocking toilets will damage the wax ring, which will cause leaks.
- Tighten the nuts securing the bowl to the floor.
- Before lifting the tank on top of the bowl, make sure you’ve installed the rubber gasket over the hole in the bottom of the tank. In addition, go ahead and put the washers and bolts in position.
- Carefully place the tank over the bowl, and tighten the nuts to secure it in place.
- Install the toilet seat and reconnect the supply line.
- Turn on the water supply and flush the toilet several times. Adjust the flush mechanism as necessary.
- Position the tank lid.
- When you’re certain there are no leaks, go ahead and cut the extra length from the floor bolts and install the decorative caps. Also, consider using a silicone caulk around the base of the toilet.
Rock Hill-area homeowners have trusted Full Spectrum Plumbing Services with their plumbing needs for over 20 years. If you’d rather have an expert replace your toilet, give us a call today.